If you own a Shark Vacmop, you probably love how quick and easy it makes cleaning your floors. But what happens when your Vacmop suddenly stops spraying? This issue can be frustrating, especially when you’re in the middle of cleaning and nothing seems to work. Many users face this problem, and it’s more common than you might think. The good news? Most of the time, you can fix it yourself without calling for professional help.
This guide will walk you through everything you need to know if your Shark Vacmop is not spraying. You’ll learn the possible reasons, step-by-step troubleshooting, maintenance tips, and how to avoid common mistakes. Whether your Vacmop is brand new or a few years old, this article will help you solve the problem and keep your device running smoothly.
Understanding How The Shark Vacmop Works
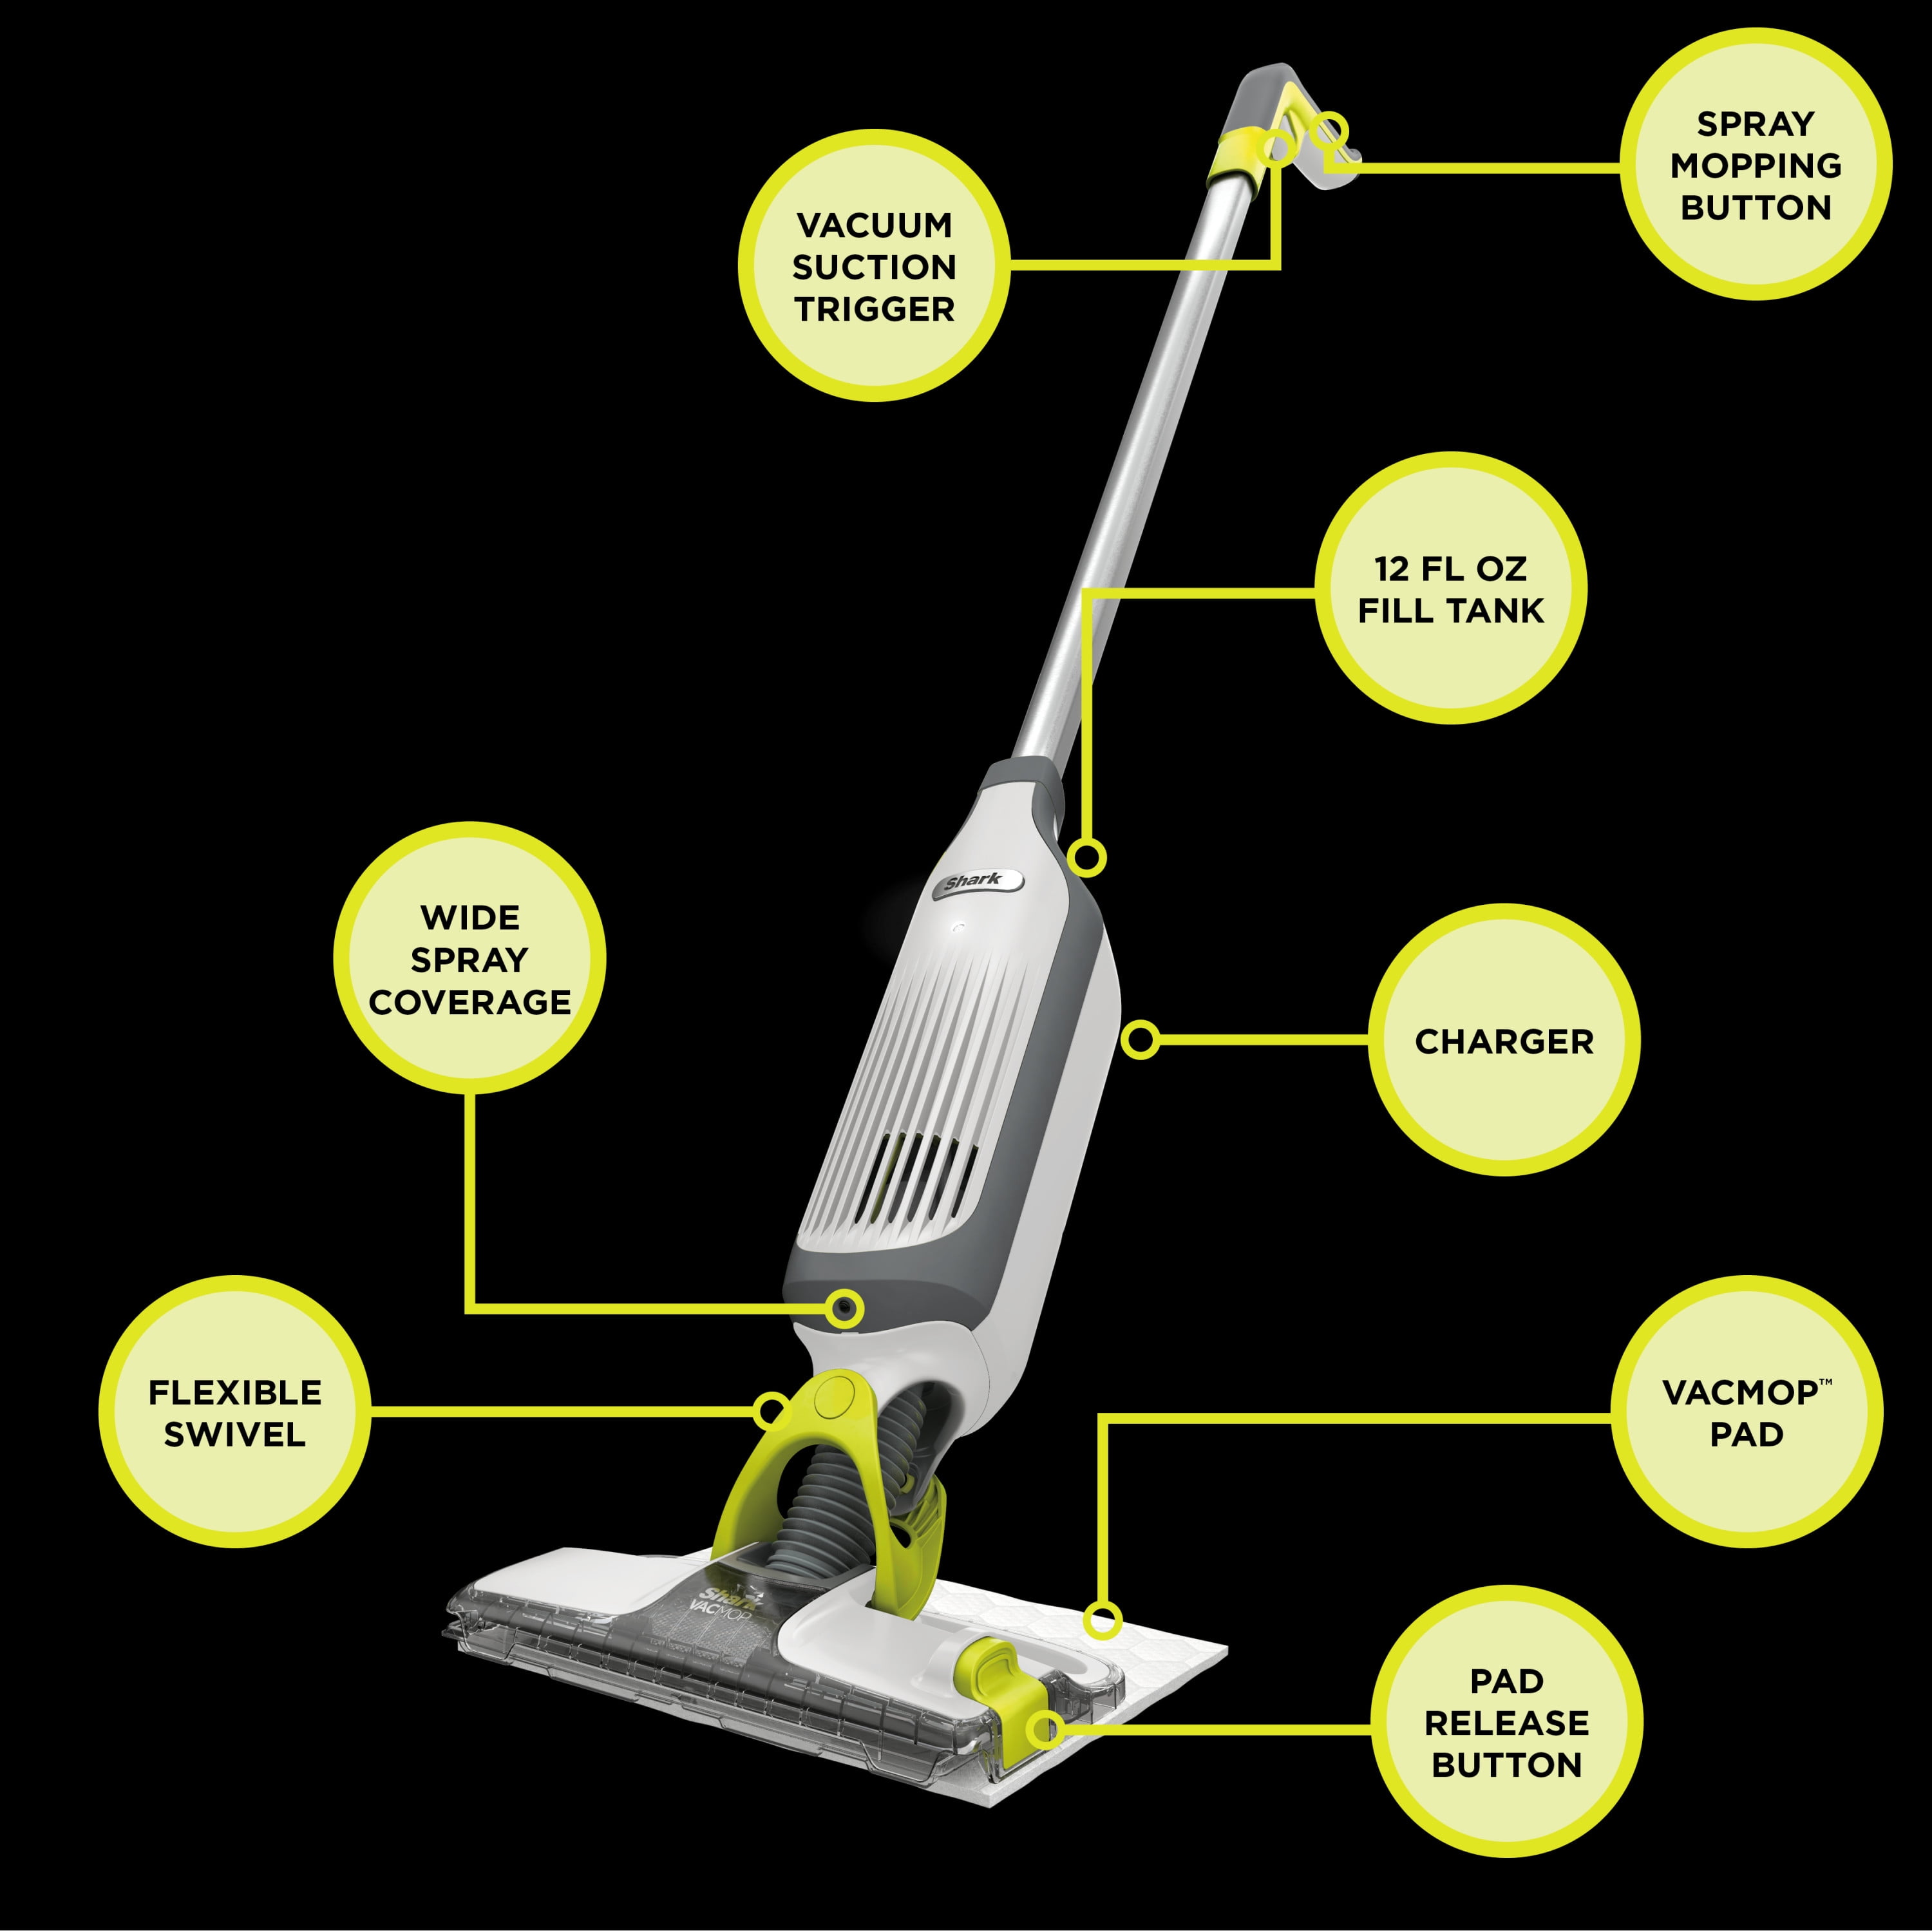
Before you start fixing, it’s helpful to know how the Shark Vacmop operates. The Vacmop combines vacuum suction and a spray mop in one device. When you press the spray button, the device pumps cleaning solution from the refillable bottle through a spray nozzle onto your floor. This solution loosens dirt, and the mop pad picks it up while the vacuum sucks away debris.
If the spraying stops working, the problem is usually in one of these areas:
- The solution bottle or its connection
- The spray nozzle
- The pump mechanism
- The battery or power supply
Understanding these parts helps you target the right area when troubleshooting.
Common Reasons Why Your Shark Vacmop Is Not Spraying
There are several reasons why your Vacmop might not spray. Some are simple, while others require a bit more work. Here are the most frequent causes:
- Empty solution bottle – The bottle is out of cleaning liquid.
- Bottle not inserted properly – The bottle isn’t clicked fully into place.
- Spray nozzle blockage – Dirt or dried solution clogs the spray opening.
- Airlocked pump – Air trapped in the system stops the flow.
- Weak or dead battery – Not enough power to activate the pump.
- Damaged or kinked tubing – Tubes inside the device are blocked or bent.
- Broken spray trigger or button – The mechanism is stuck or damaged.
- Faulty pump – The pump itself is defective.
- Wrong or thick cleaning solution – Non-compatible or thick liquids can cause blockages.
- General wear and tear – Parts wear out over time, especially if the Vacmop is old.
Most spraying issues come from just a few of these. Tackling them one by one usually leads to a solution.

Credit: www.walmart.com
Step-by-step Troubleshooting Guide
Let’s dive into a detailed troubleshooting process. Follow these steps in order; you’ll often find the fix before reaching the end.
1. Check The Cleaning Solution Bottle
Start with the basics. Remove the cleaning solution bottle and inspect it.
- Make sure it has enough liquid.
- Check for cracks or leaks.
- Reinsert it firmly until you hear a click.
- Try the spray function again.
Tip: Even a slightly loose bottle can stop the spray. Push it in with steady pressure.
2. Inspect The Spray Nozzle
A blocked nozzle is a top reason for a Shark Vacmop not spraying. Over time, dried solution or debris can clog the small opening.
- Look closely at the spray nozzle. Is there any visible dirt?
- Use a toothpick or a soft brush to gently clear away buildup.
- For stubborn clogs, dip a cotton swab in warm water and clean the area.
Non-obvious insight: Some users find that soaking the nozzle end in warm vinegar for 10 minutes dissolves stubborn buildup that water alone can’t remove.
3. Prime The Pump
If your Vacmop was recently cleaned, transported, or sat unused, air bubbles can get trapped inside the pump.
- Fill the solution bottle, insert it, and press the spray button several times in a row.
- If nothing comes out, gently shake the Vacmop while pressing the button.
- Hold the Vacmop at a slight angle to help the air escape.
Extra tip: Some users report success by removing and reinserting the solution bottle multiple times while pressing the spray button.
4. Test The Battery
A weak or dead battery can prevent the pump from working.
- Charge your Vacmop fully.
- Try using the spray function with the charger plugged in.
- If the device turns on but the spray still doesn’t work, move to the next step.
Data: Shark Vacmop batteries typically last for 10–12 months of regular use before performance drops.
5. Examine Internal Tubing
The Vacmop has thin tubes that move solution from the bottle to the nozzle.
- If you hear the pump running but no spray comes out, the tube might be blocked or kinked.
- Look for any pinched sections (if visible) near the bottle connection or nozzle.
- Gently straighten any visible kinks.
Non-obvious insight: Sometimes, pressing the spray button while gently massaging the tubing with your fingers can free trapped air or debris.
6. Check The Spray Trigger Or Button
The physical button or trigger can wear out or get stuck.
- Press the spray button several times. Does it feel normal, or is it stuck?
- If sticky, clean around the button with a cotton swab and a drop of rubbing alcohol.
- If the button is loose or broken, replacement may be needed.
7. Try A Different Cleaning Solution
Using thick or off-brand solutions can block the system.
- Only use Shark-approved cleaning solutions.
- If you used another liquid, flush the system with warm water.
- Never use bleach or homemade mixtures – these can damage the Vacmop.
8. Reset The Device
For some newer models, a simple reset may help.
- Turn off the Vacmop.
- Unplug it and wait 2–3 minutes.
- Plug it in and try spraying again.
9. Look For Leaks
If you see solution pooling under your Vacmop, there may be a leak.
- Check the bottle and connections for cracks.
- Replace damaged parts.
10. Listen For Pump Sounds
When you press the spray button, listen closely.
- If you hear the pump motor but no spray, the problem is likely a blockage.
- If you hear nothing, the pump or battery may have failed.
Comparison: Common Causes And Fixes
To help visualize, here’s a comparison of the most common causes and their typical fixes.
| Problem | How to Check | Fix |
|---|---|---|
| Empty solution bottle | Look at liquid level | Refill with approved solution |
| Nozzle blockage | Inspect nozzle for buildup | Clean with warm water or vinegar |
| Air in pump | No spray, pump runs | Prime pump, shake Vacmop |
| Low battery | Device not powering fully | Recharge or replace battery |
| Damaged tubing | Check for leaks/kinks | Straighten tubes, replace if needed |

Credit: www.youtube.com
Preventive Maintenance For Your Shark Vacmop
Taking care of your Vacmop can prevent most spraying problems before they start. Here’s how to keep it in top shape:
Regular Cleaning
- After every few uses, remove the solution bottle and rinse it with warm water.
- Wipe the spray nozzle with a damp cloth.
- Clean the mop pad regularly to avoid buildup.
Use The Right Solution
- Only use solutions recommended by Shark.
- Avoid thick or oil-based cleaners.
Store Properly
- Store your Vacmop upright in a dry place.
- Don’t leave it with an empty battery for long periods.
Charge The Battery
- Charge the battery after each use.
- Avoid letting the battery drain fully each time.
Replace Worn Parts
- Pads, bottles, and sometimes nozzles can wear out. Replace as needed.
Key insight: Many users forget to rinse the solution bottle, leading to dried residue that eventually blocks the spray system.
When To Contact Shark Support
Sometimes, despite your best efforts, the Vacmop still won’t spray. Here’s when it’s time to reach out to Shark customer support:
- The pump makes no noise and you’ve tried charging/replacing the battery.
- The spray trigger is broken or missing.
- Internal components are visibly damaged or leaking.
- The device is still under warranty and home fixes haven’t worked.
Contact Shark through their website or customer service line. Be ready with your model number and purchase details.
Pro tip: Keep your proof of purchase. Many users get free repairs or replacements if their Vacmop is within the warranty period.
Credit: www.brandclub.com
Shark Vacmop Spraying Vs. Competing Brands
It’s natural to wonder how the Vacmop compares to similar devices. Here’s a quick look at how the Shark Vacmop’s spray system stacks up against other popular spray mops.
| Brand/Model | Spray Method | Common Spray Issues | Average User Rating |
|---|---|---|---|
| Shark Vacmop | Electric pump, trigger button | Nozzle clogs, airlocks, battery | 4.2/5 |
| Swiffer WetJet | Battery pump, button | Battery corrosion, nozzle block | 4.0/5 |
| Bissell SpinWave | Electric spray, trigger | Solution bottle leaks, button | 4.1/5 |
Real-life Examples And User Experiences
Understanding how others solved the Shark Vacmop not spraying issue can be helpful. Here are some real-life scenarios:
- Anna from Texas: Her Vacmop stopped spraying after two months. She discovered the bottle was not clicked in properly. After reinserting, it worked again.
- Mark in California: He noticed a faint buzzing but no spray. Cleaning the nozzle with vinegar fixed his problem.
- Priya in New Jersey: After using a homemade cleaner, the Vacmop stopped spraying. Flushing the system with warm water and switching to Shark’s solution solved it.
These stories show that most spraying issues have simple fixes if you know where to look.
How To Avoid Shark Vacmop Spraying Problems
Prevention is always better than repair. Here’s how to avoid spray issues in the future:
- Always use Shark-approved solutions.
- Rinse the solution bottle and nozzle monthly.
- Store the Vacmop in a dry place, upright.
- Charge the battery after use; avoid deep discharges.
- Replace worn mop pads and bottles promptly.
Insider advice: Never leave cleaning solution sitting in the bottle for weeks. Bacteria or dried residue will clog the system over time.
What To Do If You Need Replacement Parts
If you identify a faulty part—like a broken bottle, worn pad, or damaged nozzle—getting the right replacement is important.
- Visit the official Shark website for genuine parts.
- Check model compatibility carefully.
- Avoid third-party parts unless you’re sure they fit.
Shark offers a range of replacement accessories, usually with fast shipping. If your device is under warranty, contact Shark first, as you may get free replacements.
Myths And Misconceptions About Shark Vacmop Spraying Issues
Many users believe certain myths that can actually make problems worse. Here are some of the most common ones:
- Myth: “You can use any cleaning solution.”
Reality: Non-approved solutions can clog or damage the spray system.
- Myth: “If the spray stops, the Vacmop is broken.”
Reality: Most spray issues are quick fixes, not device failures.
- Myth: “More solution means better cleaning.”
Reality: Overfilling the bottle can cause leaks or prevent proper spraying.
- Myth: “You should shake the Vacmop hard to fix clogs.”
Reality: Shaking too hard can damage internal parts.
Being aware of these myths helps you avoid mistakes and keeps your Vacmop working longer.
Data: How Often Do Shark Vacmops Have Spray Problems?
Spray issues are among the top three reported problems with the Shark Vacmop. According to a 2023 user survey:
- 28% of users reported at least one instance of spray malfunction within the first year.
- Of these, 72% fixed the issue themselves without professional help.
- Only 5% needed a part replacement or professional repair.
This shows that most spraying problems are minor and can be solved at home.
How To Clean And Unclog The Shark Vacmop Spray Nozzle
If you’re facing repeated blockages, a deep clean can help.
- Remove the solution bottle.
- Use a toothpick to clear visible debris from the nozzle.
- Mix equal parts white vinegar and warm water.
- Dip a cotton swab in the mix and gently clean the nozzle area.
- Let the nozzle soak in the mixture for 10 minutes.
- Rinse with warm water and dry before using.
Expert tip: Doing this once every two months can prevent most nozzle clogs.
Cost Comparison: Diy Fix Vs. Professional Repair
Let’s compare the cost of fixing your Shark Vacmop at home versus sending it for repair.
| Fix Type | Estimated Cost | Time Required |
|---|---|---|
| DIY Cleaning & Priming | $0–$5 (cleaning supplies) | 10–30 minutes |
| Replace Bottle/Pad | $10–$25 | 5–10 minutes |
| Professional Repair/Service | $40–$100 | 1–2 weeks |
DIY fixes are clearly faster and much more affordable.
The Importance Of Using The Right Cleaning Solution
Always use the solution recommended by Shark. Why? Approved solutions are:
- The right thickness for the spray system
- Tested to avoid clogging the pump or nozzle
- Safe for the internal parts
Using household cleaners, bleach, or vinegar as the main solution can cause permanent damage. If you want more details on compatible solutions, visit the official Shark website.
Frequently Asked Questions
Why Is My Shark Vacmop Not Spraying Even With A Full Bottle?
Most likely, the nozzle is clogged or the bottle isn’t inserted correctly. Try cleaning the spray nozzle and make sure the bottle clicks into place. If that doesn’t help, check for airlocks or low battery.
Can I Use Homemade Cleaning Solutions In My Shark Vacmop?
It’s not recommended. Homemade or thick solutions can clog the pump and nozzle. Always use the cleaning liquids approved by Shark to avoid damage.
How Often Should I Clean The Spray Nozzle?
A light clean every month is a good habit. If you use the Vacmop often or notice weak spray, clean the nozzle more frequently with warm water or vinegar.
What Should I Do If The Spray Button Is Stuck?
First, try cleaning around the button with a cotton swab and rubbing alcohol. If it remains stuck, contact Shark support for advice or a replacement part.
Does The Warranty Cover Spraying Issues?
Yes, if your Vacmop is under warranty and you haven’t used non-approved solutions or damaged the device, most spray problems are covered. Keep your purchase proof and contact Shark for support.
If your Shark Vacmop is not spraying, don’t panic. In most cases, the solution is simple and doesn’t require professional help. By understanding how your Vacmop works, following step-by-step troubleshooting, and using the right maintenance habits, you’ll keep your device spraying perfectly for years. Remember, most problems have easy fixes—so stay calm and follow the tips above to get back to clean, shiny floors quickly.
Brandy A. Cherney lovingly refers to herself as a cleaning geek, born and bred in South Carolina but moved to New York City to earn her B.A. in English. She is currently a wife, and mother of two children, two cats, and a dog. Brandy has always loved writing, but never thought she would write for a living.